The Abstract Window Toolkit (AWT) is a Java package that provides a set of graphical user interface (GUI) components and tools for building GUIs in Java applications. AWT is part of the Java Foundation Classes (JFC) and is one of the core technologies used for creating graphical user interfaces in Java.
The AWT package includes classes for windows, buttons, text fields, checkboxes, menus, and many other GUI components. It also provides classes for handling events such as mouse clicks and keyboard input. AWT is platform-dependent, which means its appearance and behavior may vary across different operating systems because it relies on the native GUI components of the underlying platform.
AWT Components in Java
Here are some key components and concepts in the AWT package:
Component: The base class for all AWT components. Components are visual elements like buttons, text fields, and panels.
Container: A component that can contain other components. Containers are used to organize and layout GUI components.
Layout Manager: AWT provides several layout managers (e.g., FlowLayout, BorderLayout, GridLayout) that determine how components are arranged within a container.
Event Handling: AWT uses an event-handling model where events, such as mouse clicks or key presses, are generated and sent to event listeners. Event listeners are responsible for handling specific types of events.
Graphics: AWT provides a Graphics class for drawing shapes, text, and images on components.
Window: The Window class represents a top-level window in a GUI application.
Frame: The Frame class is a subclass of Window and represents a decorated window with a title bar, borders, and controls.
Panel: The Panel class is a container that does not have a title bar or borders.
While AWT was the original GUI toolkit for Java, Swing (part of the JFC) was later introduced to provide a more powerful and flexible set of GUI components. Swing components are lightweight and not tied to the native platform’s GUI components, resulting in a more consistent look and feel across different operating systems. However, AWT is still used in some cases, especially for simpler applications or when compatibility with older systems is a concern.
The AWT package is used for components and awt. event package is used for the action performed. If we want to select only one option we use checkboxes.CheckboxGroup is a set of checkboxes in which we can select only one option(checkbox) . The checkboxes which are set in CheckboxGroup are called “radio button”.
Import AWT Package in Java
import java.awt.*;
import java.awt.event.*;
public class lcdd extends Frame implements ActionListener
{
CheckboxGroup cbb;
Checkbox oo1,ff;
Label l1;
Button oo;
public lcdd()
{
setBackground(Color.pink);
cbb=new CheckboxGroup();
oo1=new Checkbox(“on”,true,cbb);
ff=new Checkbox(“off”,false,cbb);
oo=new Button(“Ok”);
setLayout(null);
l1=new Label(“XCnotes.com”);
l1.setBounds(225,70,100,10);
oo.setBounds(300,500,50,20);
oo1.setBounds(300,450,50,20);
ff.setBounds(370,450,50,20);
add(oo);
add(l1);
add(oo1);
add(ff);
oo.addActionListener(this);
}
public void actionPerformed(ActionEvent eh)//click event on button
{
if(eh.getSource()==oo)//when we click on this button the repaint() called
{
repaint();
}}
public void paint(Graphics gl)
{
if(oo1.getState())
{
gl.drawRect(100,100,300,200);
gl.fillRect(100,100,300,200);
Image piic=Toolkit.getDefaultToolkit().getImage(“cou.jpg”);//pic displayed
gl.drawImage(piic,110,110,280,180,this); //draw the image
gl.fillRect(230,300,30,50);
gl.fillOval(170,330,150,100);
}
else
{
gl.drawRect(100,100,300,200);
gl.fillRect(100,100,300,200);
gl.fillRect(230,300,30,50);
gl.fillOval(170,330,150,100);
}
}
public static void main(String aa[])
{
lcdd lc=new lcdd();//lc is the object of class lcdd
lc.setSize(300,300); //we can set the size of the frame by using setSize()
lc.setVisible(true);
lc.addWindowListener(new WindowAdapter() //for window closing
{
public void windowClosing(WindowEvent ew) /*when we click on close then this event perform*/
{
System.exit(0); //for closing
}
});
}
}

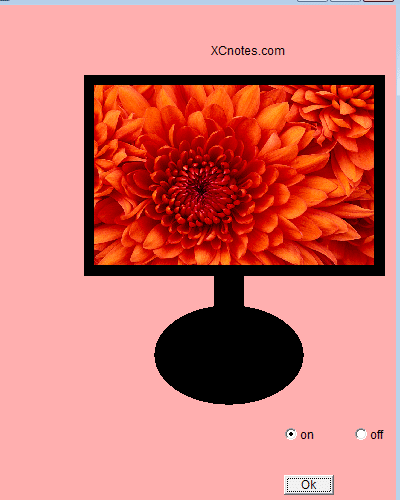
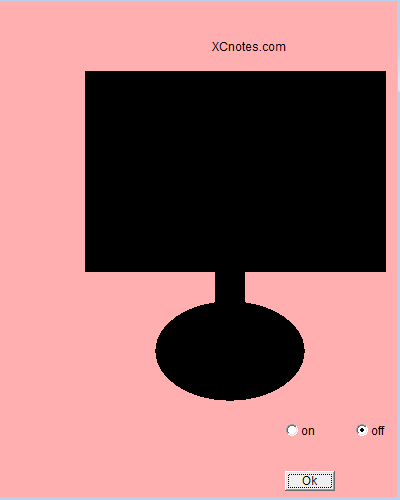
In the above example when we select the checkbox and click on the button the image will be shown and when we select the off checkbox and click on the button then the image will not shown(like switch on and off)


